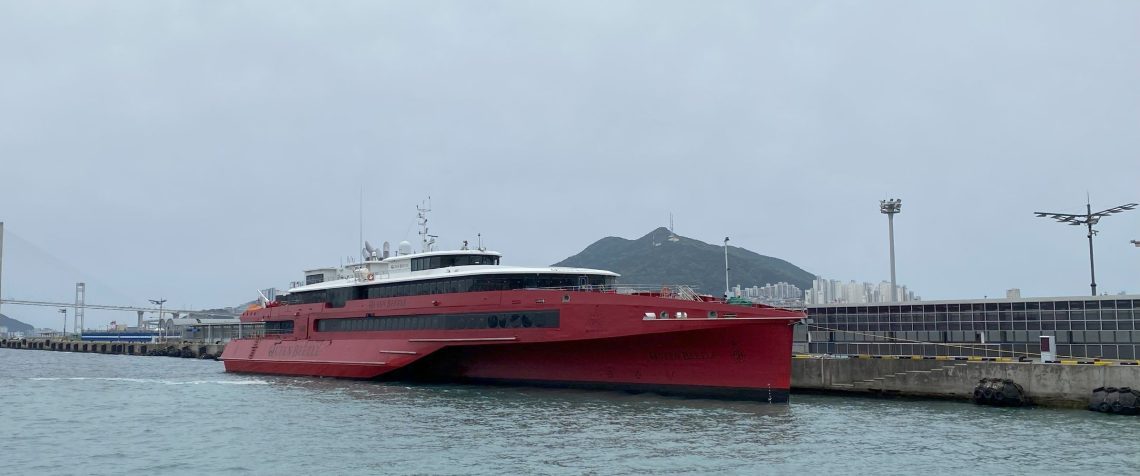
From Fukuoka to Busan with the JR Queen Beetle Ferry
I prefer ground travel (or sea travel) over air travel when financial and time costs make sense, so when I saw there was a high speed ferry from Fukuoka, Japan to Busan, South Korea for less than $100 and only 3.5 hours travel time, I decided to try it out.
I had a lot of questions about taking a ferry from one country to another and all the blog posts I found were from pre-COVID times. Hopefully my post will be helpful to those who’re looking for more recent information!
This is my experience taking the international ferry from Fukuoka, Japan to Busan, South Korea in April 2023.
This post contains affiliate links. If you click on a link and buy something, I get a small percentage at no extra cost to you. Your support helps keep this blog running— thank you! Read full disclosure here.
Ferry tickets
Buying tickets was easy: the JR Beetle website has an English version where you can purchase your ticket using a foreign credit card.
If you book online you’ll be able to pay the tourist and port fees up front. A few years ago, those were separate charges from the ticket price and could only be paid in cash when you boarded the ferry, but with the online tickets they’re rolled into the total cost.
My ticket ended up being ¥9,700 or about $72 USD. It may be slightly higher now because I bought mine during a promotion, but generally it’ll be less than $100 USD.
You can choose your seat 7 days before departure, or do like me and forget until 5 minutes before the deadline. If you don’t pick a seat ahead of time, you can choose it at check-in.
🛳️ Alternatively, you can book a JR Queen Beetle ferry ticket with Klook which is MUCH easier and the same price.
Port Hakata

The ferry leaves from the Hakata Port International Terminal in Fukuoka, Japan. If you’re coming via public transit or walking, set your directions for the terminal’s “taxi stand” on Google Maps to make sure you go down the right roads.
Check-in starts 2 hours before departure time.
You’ll have to fill out a health questionnaire and show both that and your passport to a staff member before going to the actual check-in window where you’ll get a boarding pass and documents you’ll need to fill out for Busan customs.
The Busan port isn’t part of the Korean Q Code system so it’s still the old-school way of entry. Papers are: health questionnaire, customs declaration, arrival card. Very easy to fill out.
The port building itself is big, but mostly just waiting rooms. Downstairs has a Korean BBQ restaurant, but it didn’t seem to be open when I was there. Waiting room upstairs has vending machines, bathrooms.
Boarding starts 45 minutes before departure time. Go through the gate and there’s a duty-free shop with mostly liquor and purses, no snacks or food.
On board the JR Queen Beetle

Boarding the ferry means walking through a covered walkway from the main building to the boarding zone. Quite a hike! I saw several seniors struggle with their huge suitcases.
Once on the ferry, there’s complimentary luggage storage and small lockers for your stuff.
1st deck is standard class, with vending machines, bathrooms, a nursery and “kids area” and a cafe/bar with hot food.
2nd deck is business with another cafe and then 3rd is a “sun deck”/viewing room. Free wifi throughout (though it’s spotty).
Be sure to grab the souvenir rubber stamp!

My experience on the JR Beetle
My trip wasn’t crowded at ALL; the ferry was practically empty. I did see some other backpackers, but most passengers seemed to be retirees and business men.
I grabbed some chicken and fries from the on-board cafe and a milk tea from the machine. The food was fine– not great, not bad. The chicken had surprisingly flavorful breading which was nice.
We set off relatively smoothly and I filled out my customs forms.
Unfortunately, this is where things took a turn.
It was a gray, rainy, STORMY day. The ferry had actually been canceled a few days prior because the seas had been too rough. While it wasn’t as bad today, we were in for some trouble.
We VERY quickly hit turbulence! It was so bad they had to close the cafe because dishes kept falling onto the floor. People kept falling into the seats and stumbling around, and the staff asked everyone to stay seated.
The combination of high speed + large waves + constant rolling motions got to me. I spent 2.5 of the 3.5 hour travel time clutching my chair and trying not to puke.

Finally, about an hour from Busan, we finally slowed down and my stomach stopped threatening to relocate to my throat.
Even with all the turbulence, we only arrived about 15 minutes later than expected. Not bad!
Busan port building & passport control
Busan customs
First: health questionnaire gets passed to a person, who then waves you to the next part. Arrival card and passport given to another person, and then you do the fingerprint scan and face scan thing. A sticker gets placed in your passport and on you go. (I wasn’t asked any questions and I got the full 90 days visa automatically, yay!)
Then: hand in the customs declaration on the way out (again very casual).
Finally: luggage scan and metal detector before finally being released out the door. They don’t care about liquids or electronics, they’re just scanning for contraband, basically.
Busan Port

Busan port is MASSIVE! You can get a SIM card there (though I just got an eSIM from Klook), visit the tourist info office and grab some lunch from the 7-11– all of which I did. I’d also recommend finding an ATM and getting money here.
📲 Traveling through multiple countries? Grab the Asialink regional eSIM from Airalo. New users, use promo code NEWTOAIRALO15 to save 15%. Existing users, use promo code AIRALOESIM10 to save 10%!
I didn’t see a transit card dispenser and I forgot to check the 7-11 for one as well, but you can get a NAMANE card at a kiosk in Busan Station, about 15 minutes walking from the port.
Bonus: there’s a Geocache in the terminal’s parking lot next door. It was an easy find but I always feel super exposed getting caches in paid parking lots, since I probably look highly suspicious digging around near cars I don’t own.
Previous Entry
Fukuoka, Japan
Next Entry
Busan, South Korea
Save to Pinterest


Explore More
More adventures in South Korea:
- Budget Guide to Seoul
- Visiting the Sky Hub Lounge at Seoul Incheon Int’l Airport, South Korea
- Budget Guide to Jeju Island
- A month in South Korea | May 2023 Travel Budget Breakdown
- Phantom of the Opera in Busan, South Korea (2023)
Best Travel Resources
- 🛕Klook for tour discounts and attraction tickets
- 📱Airalo for eSIMs around the world
- 🛌Hostelworld for budget stays
- 🚙DiscoverCars for international car rentals
- 👩💻ExpressVPN to stay safe while browsing the web
- 🧑⚕️VisitorsCoverage for trip insurance
Anastasia Finch
Anastasia is a former librarian turned digital nomad. She's been traveling the world full time for two years and has visited 18 countries so far! Just Gone Wandering is a travel resource for solo female travelers on a backpacker's budget-- or slightly more-- and highlights amazing places to visit as well as providing tips and tricks for traveling smart and frugal. Read more...


You May Also Like
From Phonsavan to Vientiane by Plane
From Sukhothai to Chiang Mai by bus
